Rocket Building Made Easy.
These building techniques are the result of the genuis and hard work of the "Internet Water Rocketeers". See the LINK section at the end of the instructions so you can start visiting these rocket scientists on-line.
It is best to begin making rockets using 2-liter Pop Bottles. When selecting a bottle to use consider the following:
We are going to make a rocket using some simple techniques which creates reusable parts, and increases safety. The rocket will have a fin and nose cone section that will slide over the main bottle. This allows you to reuse or replace these sections easily in case of damage. It also allows the main bottle to withstand the pressures used. The outer sleeves will help contain any rupture of the inner bottle due to excessive pressure.
To make this rocket you will need several 2-liter bottles, some materials for fins (1/8" or less plastic or stiff balsa wood), a tennis ball or swimming noodle for a nose cone, some DUCT TAPE, Household GOOP adhesive, a razor knife, heavy scissors, and a small saw.
The rocket will have a single bottle as its pressure vessel. Fins will be attached to a wide band cut from a second bottle which will slip over the nozzle end of the pressure vessel. The nozzle end of this second bottle will slip over the flat end (bottle bottom) of the pressure vessel forming the top of the rocket. A nose cone made from a tennis ball or swimming noodle will be the final touch.
First collect a bunch of 2-liter pop bottles. I would suggest getting a few Faygo bottles and a few Coke bottles. Using a permanent marker, mark each bottle as to the brand. Next you need to remove the labels. We need to find 2 bottles that will slide over one of the other bottles. If possible measure the bottle circumferences to the closest 1/32 inch. If that isn't possible, you will have to cut the bottom off a bottle and see if it will slide over another one. You will keep the smaller bottle in one piece and cut the larger one into several parts.
First mark the larger bottle where you want to cut it. The easiest way is to rotate the bottle while holding a marker pen against the bottle. Do this for each place you need to cut the bottle. For this project you need to make two lines.
Next have an adult use a razor knife to make a cut on each line about 1-2" long. This will allow the kids to use the heavy scissors to cut along the line. For our purposes the kids just need to make a fair cut along the line. If they stray a little bit, don't worry it won't really mess anything up.
Now you just need to follow the illustrations below to create your rocket.
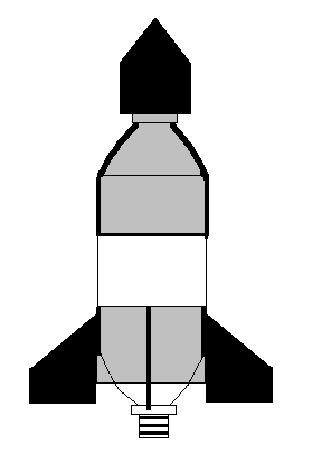
The nose cone is the nozzle end of a 2-liter bottle that can slip over our rocket body. There should be about
4-5" of bottle down from the rounded shoulder. The top of the nose cone can be either a tennis ball that is
slit to cover the bottle cap on top, or it can be shaped from a swimming noodle. If using a swimming noodle, just
drill or cut out a 1" hole on the bottom of the noodle so the bottle cap can fit inside. A SUREFORM tool is
best way to shape noodle material.
This is the main body of our rocket. It is a plain 2-liter pop bottle with the label removed. Use a hairdryer
to remove the label. Turpentine or "GOOF OFF" works well to remove glue residue. Remember to store the
rags you use safely to prevent fires.
Here is the fin section. You can have 3 or 4 fins glued to a 4-5" band cut from a larger bottle. Glue them
on with Household GOOP glue. Masking tape can be used to hold fins in place while drying.
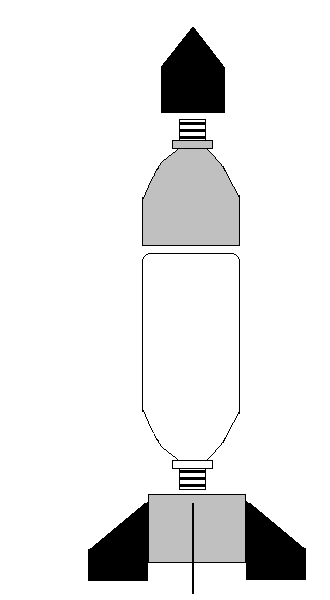
Here is the rocket fully put together.
The noodle nose cone (or tennis ball) has been fitted over the bottle cap of the top section. The top section
has then been slid over the top of our rocket body. Use Duct Tape or other Adhesive tape to fasten this section
to the main rocket body. Don't slide the rocket body way up inside the nose cone section. Leave as much empty space
as possible. This makes a crush zone for those hard landings.
The fin section slides up over the bottom and is also taped onto the main rocket body. Tape the fins on the
body as low as possible without interfering with your launch mechanism.
As a final step, use a razor knife to chamfer the opening of the rocket nozzle. Angling the inside nozzle opening
will allow it to more slide onto the launcher a lot easier.
This is just a partial list of the many fine sites on the Internet dealing with Water Rocketry. Check back soon for a more complete listing.